You are here: Home> Cuisine > Indian Veg Recipes > Punjabi > Punjabi Paneer Recipes > Cabbage and Paneer Parathas
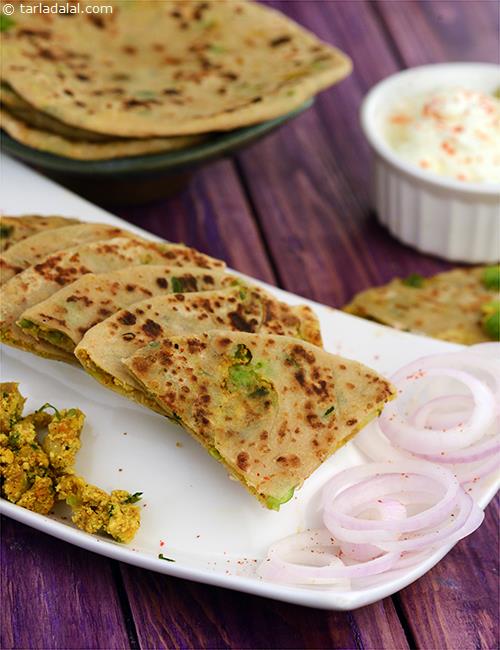
cabbage paneer paratha | healthy cabbage paneer paratha | gobi paneer paratha |

Tarla Dalal
03 April, 2025

Table of Content
Tags
Preparation Time
15 Mins
Cooking Time
20 Mins
Total Time
35 Mins
Makes
5 parathas.
Ingredients
For The Cabbage and Paneer Parathas Dough
1 cup whole wheat flour (gehun ka atta)
1 tbsp melted ghee
salt to taste
To Be Mixed Into A Stuffing For Cabbage and Paneer Parathas
1 1/4 cups grated cabbage
1/2 cup crumbled paneer (cottage cheese)
2 tbsp finely chopped coriander (dhania)
1 1/2 tsp finely chopped green chillies
salt to taste
Other Ingredients For Cabbage and Paneer Parathas
whole wheat flour (gehun ka atta) for rolling
oil for cooking
For Serving With Cabbage and Paneer Parathas
Method
Cabbage and Paneer Parathas recipe with step by step photos
-
-
To make the dough for cabbage paneer paratha | healthy cabbage paneer paratha | gobi paneer paratha | in a deep bowl take whole wheat flour ie. Gehun ka atta. You can even add little maida if you want but, wheat flour makes it healthy and nutritious.
-1-185429.webp)
![]()
-
To this add salt to taste and ghee. Mix this well with your hands so that the salt and ghee evenly spread out in the flour.
-2-185429.webp)
![]()
-
Slowly add water and combine all the ingredients.
-3-185429.webp)
![]()
-
Knead into a soft dough. The dough should be smooth & not sticky i.e it should not stick to your hands. We have used approximately 1/2 cup of water.
-4-185429.webp)
![]()
-
Cover with a lid or damp muslin cloth and keep aside for 10 to 15 minutes. We cover the dough so that it dos not dry out.
-5-185429.webp)
![]()
-
To make the dough for cabbage paneer paratha | healthy cabbage paneer paratha | gobi paneer paratha | in a deep bowl take whole wheat flour ie. Gehun ka atta. You can even add little maida if you want but, wheat flour makes it healthy and nutritious.
-
-
Place the grated cabbage in a deep mixing bowl. Grating the cabbage allows it mix very well with other ingredients. If you do not want to use cabbage in Cabbage and Paneer Paratha, you can use other vegetables like methi and make a Methi Paneer Paratha.
-1-185430.webp)
![]()
-
Now add the crumbled paneer to this.
-2-185430.webp)
![]()
-
Now add the finely chopped coriander for a fresh, herby taste.
-3-185430.webp)
![]()
-
Add finely chopped chillies and salt for a spicy bite. If you want you can even add a little amchur to add a zingy taste.
-4-185430.webp)
![]()
-
Mix all the ingredients well by hand or with a spoon so that every ingredient is evenly mixed.
-5-185430.webp)
![]()
-
Divide the stuffing into 5 equal portions. Keep aside.
-5-185430.webp)
![]()
-
Place the grated cabbage in a deep mixing bowl. Grating the cabbage allows it mix very well with other ingredients. If you do not want to use cabbage in Cabbage and Paneer Paratha, you can use other vegetables like methi and make a Methi Paneer Paratha.
-
-
To make cabbage paneer paratha | healthy cabbage paneer paratha | gobi paneer paratha | divide the dough into 10 equal portions and shape them into balls.
-1-185431.webp)
![]()
-
Take one ball of dough, flatten it, dip it in flour and dust off the excess flour..
-2-185431.webp)
![]()
-
Roll it out into a 125 mm. (5”) diameter circle using a little wheat flour for rolling. This should be a very thin roti. Repeat the same with the remaining portions of the dough.
-3-185431.webp)
![]()
-
Sprinkle a litle flour on clean, dry surface and place the roti on it. This is to avoid the roti from sticking to the surface.
-4-185431.webp)
![]()
-
Evenly spread one portion of the stuffing over one roti. Leave about 1/2 centimeter space from the edges so that it is easier to seal the edges.
-5-185431.webp)
![]()
-
Dip one finger in water and apply it on the edge of the roti.
-6-185431.webp)
![]()
-
Place 1 more roti over the stuffing.
-7-185431.webp)
![]()
-
Seal the edges properly so that the filling does not fall out and so that the dough does not tear.
-8-185431.webp)
![]()
-
Heat a non-stick pan and place the Cabbage and Paneer Paratha over it.
-9-185431.webp)
![]()
-
Cook on one side till light brown spots appear and then flip the Cabbage and Paneer Paratha over. Be extremely careful while flipping it as it you do not want to unseal the edges of the paratha.
-10-185431.webp)
![]()
-
Now, using 1 tsp oil, cook the paratha on both sides, on a slow flame, till golden brown and cooked properly. Since this is a thick paratha the sides will take longer to cook and hence it should be cooked on a slow flame. Since the edges are sealed this way, press down a little on them so that the sides cook well.
-11-185431.webp)
![]()
- Repeat steps 4 to 11 to make 4 more delicious cabbage paneer paratha | healthy cabbage paneer paratha | gobi paneer paratha |
-
Serve cabbage paneer paratha | healthy cabbage paneer paratha | gobi paneer paratha | immdiately with a Kesar Pista Lassi and a Spicy Lemon Pickle
-13-185431.webp)
![]()
-
To make cabbage paneer paratha | healthy cabbage paneer paratha | gobi paneer paratha | divide the dough into 10 equal portions and shape them into balls.
Nutrient values (Abbrv)per plate
| Energy | 192 cal |
| Protein | 5.1 g |
| Carbohydrates | 17.2 g |
| Fiber | 1 g |
| Fat | 11.5 g |
| Cholesterol | 0 mg |
| Sodium | 5 mg |
Click here to view Calories for Cabbage and Paneer Parathas
The Nutrient info is complete

Manali Gawad
March 13, 2025, midnight
Nice without much spices.

Tarla Dalal
March 13, 2025, midnight
Manali, Thanks for the feedback !!! keep reviewing recipes you loved.

bharat tandale
March 13, 2025, midnight
Mast pusthik hai yeh paratha

manjupatil
March 13, 2025, midnight
Thank you madam for wonderful recipe its comes out very yummy....

Foodie#488647
March 13, 2025, midnight
Very yummy

Priya2188
March 13, 2025, midnight
Very nice recipe :)

Juhi Danani56
March 13, 2025, midnight
Thats really a nice recipe explained in hindi. Thank you.!!

Pempemp
March 13, 2025, midnight
The stuffing for the paratha is simple, but tastes good. I made these parathas when I had my Jain friend over for lunch.Served the paratha along with Panchmel Dal(Jain), Jeera Rice and Gajar Marcha Nu Sambhaariyu.

Manjeet
March 13, 2025, midnight
Mazza aa gaya Tarla Ji!!!! Bale Bale!!!

Jaya
March 13, 2025, midnight
Cabbage and Paneer in parathas...the thought itself was delicious! Made it for lunch today and everyone at home enjoyed it. Loved the green chilli teasers in the stuffing. its worth it ;)

Sophie
March 13, 2025, midnight
Looks yummy and easy to make..thanks anyway for sharing I''ll gonna make it for lunch

Tarla Dalal
March 13, 2025, midnight
Sophie, all the best !!



-8013.webp)
