You are here: Home> Cuisine > Italian Vegetarian > Italian Appetizers > Cheese Poppers
cheese poppers recipe | Indian style cheese poppers |

Tarla Dalal
06 December, 2024
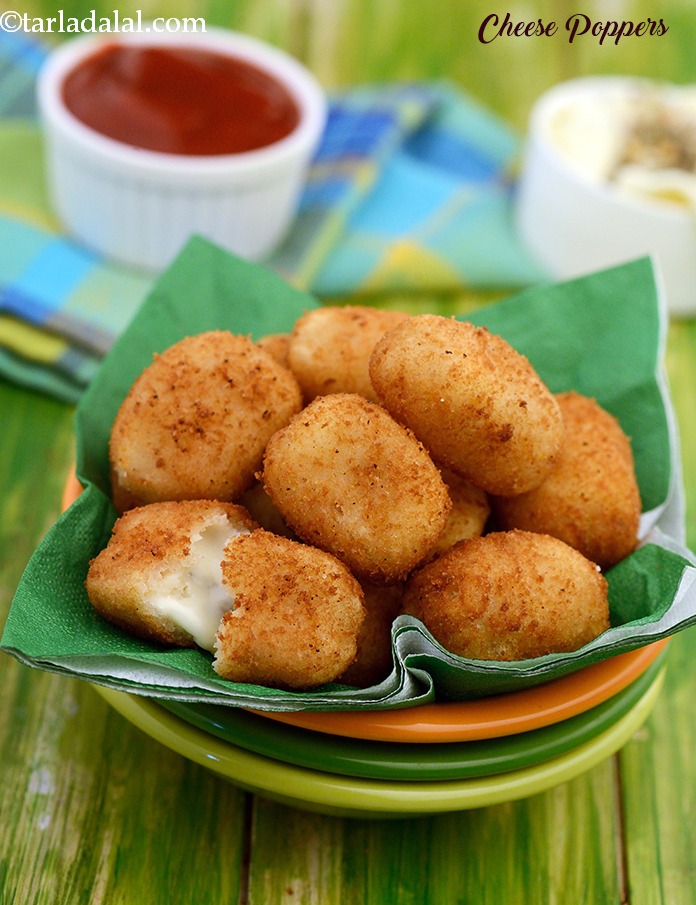
Table of Content
These exciting Cheese Poppers feature herbed cheese slice rolls that are batter-fried to perfection. A melt-in-your-mouth treat, which does not melt from your memory forever!
It is amazing how a small sprinkling of mixed herbs with chilli flakes can transform plain cheese slices into a flavourful Cheese Poppers treat for your taste buds.
Cheese Poppers is a great hit with my kids and a perfect kids after school snack.
An accompaniment of Schezwan sauce adds great value to the Cheese Poppers. You will also relish other cheesy snacks like Cheese Corn Balls, Cheese and Spring Onion Samosa and Broccoli and Cheese Balls.
Enjoy how to make cheese poppers recipe | Indian style cheese poppers | with detailed step by step photos and video below.
Tags
Preparation Time
10 Mins
Cooking Time
15 Mins
Total Time
25 Mins
Makes
15 pieces
Ingredients
For Cheese Poppers
5 amul cheese slices
3/4 cup plain flour (maida)
1 1/2 cups fresh bread crumbs
oil for deep-frying
To Be Mixed Into A Herbed Mixture
1 tsp dried mixed herbs
1 tsp dry red chilli flakes (paprika)
salt to taste
For Serving With Cheese Poppers
Method
- To make cheese poppers, combine the plain flour and ¾ cup of water in a deep bowl and mix well to make a smooth batter. Keep aside.
- Divide the herbed mixture into 5 equal portions and keep aside.
- Place a cheese slice on a flat, dry surface and place 1 portion of the herbed mixture at one end of the cheese slice and roll it up tightly.
- Cut the cylindrical roll into 3 equal pieces.
- Repeat steps 3 and 4 to make 12 more poppers.
- Dip each piece in the plain flour batter and roll it in bread crumbs till they are evenly coated from all the sides. Repeat this procedure once more with each piece so as to seal the herbed mixture in the cheese slice properly.
- Heat the oil in a non-stick deep pan and deep-fry them, 3 at a time, till they turn golden brown in colour from all the sides.
- Serve the cheese poppers immediately with schezwan sauce.
cheese poppers recipe | Indian style cheese poppers | Video by Tarla Dalal
Cheese Poppers recipe with step by step photos
-
- Cheese poppers are a treat to the taste buds, you can make it for a party or a high tea and we assure you, your guests would drool over it. If you like the recipe, the links given below are some similar recipes :
-
-
For the batter to coat the Cheese poppers, in a deep bowl take the plain flour.
-1-186757.webp)
![]()
-
Gradually add water to form a smooth batter. We have used around ¾ cup of water. The quantity of the water will depend upon the quality of your flour.
-2-186757.webp)
![]()
-
Mix well with a whisk to make a lump-free, thick batter. Keep aside
-3-186757.webp)
![]()
-
For the batter to coat the Cheese poppers, in a deep bowl take the plain flour.
-
-
For making the herb mixture for Cheese poppers, in a small bowl take the dried mixed herbs
-1-186758.webp)
![]()
-
Add the chilli flakes.
-2-186758.webp)
![]()
-
Add salt and black pepper to taste. Use salt moderately as cheese slices are already salty. Mix well.
-3-186758.webp)
![]()
-
For making the herb mixture for Cheese poppers, in a small bowl take the dried mixed herbs
-
- For preparing the Cheese poppers, place a cheese slice on a flat, dry surface. Remove them from the refrigerator approximately 10 minutes before preparing the cheese poppers. If the cheese slices are too cold while rolling, they will start breaking and won’t hold the shape
-
Place 1 portion of the herb mixture at one end of the cheese slice.
-2-186759.webp)
![]()
-
Roll it up tightly. We have made use of Amul cheese slice which is easier to roll as compared to cheese slices of other brand.
-3-186759.webp)
![]()
-
Cut the cylindrical roll into 3 equal pieces. Repeat steps 1 to 4 and make 12 more cheese poppers. We will now start coating them. Always make use of both hands, one for dipping in batter and other for coating in breadcrumbs which helps in keeping the breadcrumbs dry and preventing them from turning soggy.
-4-186759.webp)
![]()
-
-
Dip a piece in the plain flour batter. Always dip the Cheese poppers in the flour batter first as it acts like a glue and helps in coating with breadcrumbs.
-1-186760.webp)
![]()
-
Roll it in breadcrumbs till they are evenly coated from all the sides. You can also make use of panko breadcrumbs. Ensure the breadcrumbs are fine so they coat the cheese poppers better, which will potentially decrease the chance of cheese melting and oozing out while being fried. Repeat step 1 and 2 as double coating results into extra crunchy cheesy poppers.
-2-186760.webp)
![]()
- Repeat this procedure with all the pieces and keep all the Cheese poppers ready for frying. If not frying immediately, then you can refrigerate the cheese popper rolls. Also, refrigerating makes them firm which helps in frying easily.
-
Dip a piece in the plain flour batter. Always dip the Cheese poppers in the flour batter first as it acts like a glue and helps in coating with breadcrumbs.
-
- For frying the Cheese poppers, heat the oil in a nonstick deep pan.
-
Carefully put 3 Cheese poppers in the oil. Deep fry, without over-crowding the pan, so the temperature of the oil does not drop drastically.
-2-186761.webp)
![]()
-
Deep-fry them on a medium flame till they turn golden brown in colour from all the sides. Do not stir too much or the Cheese popper might break.
-3-186761.webp)
![]()
-
Remove Cheesy poppers on a plate.
-4-186761.webp)
![]()
-
Serve the Cheese Poppers immediately with schezwan sauce.

![]()
-
- We have used Amul cheese slices, make sure you do not use the cheese that has been at room temperature for very long and also not the ones that been cold and in the fridge. For this recipe it is very important to use cheese that is at room temperature for only 20 minutes or so.
- At times cheese on rolling will tear but don’t worry.
- Make sure the coat the Cheese poppers well in the plain flour-water mixture and then the breadcrumbs should be coated very well as well.
- You can deep-fry immediately or leave it in the fridge and then deep-fry.
- Do not fry more than 2 at a time. It wont consume time, as it cooks faster.
- Do not stir the Cheese poppers when they are in oil a lot as they will crack and the cheese will ooze out.
- Do not fry on a slow flame, deep-fry on a medium flame.
- Do not drain Cheese poppers on absorbent paper as the cheese if little also has oozed out it will stick ot the absorbent paper.
Nutrient values (Abbrv)per plate
| Energy | 91 cal |
| Protein | 3.2 g |
| Carbohydrates | 11 g |
| Fiber | 0 g |
| Fat | 3.8 g |
| Cholesterol | 6.7 mg |
| Sodium | 83.5 mg |
Click here to view Calories for Cheese Poppers
The Nutrient info is complete

Vidya
March 13, 2025, midnight

Pallavi
March 13, 2025, midnight
I tried the recepie but while rolling the cheese slices they crumbled into pieces and found it difficult to manage them while dipping in maida batter... even while frying the cheese was leaking ... but after adding corn flour to bread crumbs frying them became easier and it was very tasty...

Tarla Dalal
March 13, 2025, midnight
Hi Pallavi, Make sure your cheese slices are not very frozen to avoid them from breaking. Thank you for your kind words. Do try more and more recipes and let us know how you enjoyed them. Happy Cooking !!

Akshaya Dheer
March 13, 2025, midnight
Hello mam, If I donot have maida handy, can I use wheat flour (chapatika atta)? If yes, what are the pros and cons? And what is the consistency of the maida batter? Thank u so much for tos easy n quick recipe!

Tarla Dalal
March 13, 2025, midnight
Hi Akshaya, We would suggest to buy maida as it will taste and hold the poppers well. We have not tried with whole wheat flour. Do try it and let us know how it turned out...Happy Cooking !

Foodie #648439
March 13, 2025, midnight

Seema
March 13, 2025, midnight
These poppers were an absolutely cheesy delight to have. I loved how the spices combined so well with the cheese and bread crumbs to provide a perfect balance to the recipe. I know that you suggested using amul cheese slices but after trying it the second time with Go cheese slices, I found that it tasted better the second time around. The flavour and smooth texture of Go cheese had a slight edge and made the poppers pop even more! Thank you for sharing this lovely recipe!

Tarla Dalal
March 13, 2025, midnight
Hi Priya , we are delighted you loved theCheese Poppers recipe. Please keep posting your thoughts and feedback and review recipes you have loved. Happy Cooking.

Gandhi Dhwani
March 13, 2025, midnight
This is just so cheesy and amazing. I should much much delightful then corn cheese balls also. The herbs add a superb flavour to them. When you take the first bite, the cheese literally melts. It is just irresistible.

Foodie #667647
March 13, 2025, midnight
what is mixed herbs

Tarla Dalal
March 13, 2025, midnight
Mixed herbs is just right for boosting the flavour of pasta sauces, soups, stews, stuffing, breads, marinades, butter, salad dressings, stocks, vinegars, vinaigrettes, and even some desserts, drinks and confectionaries.

riddhigaurav2311
March 13, 2025, midnight
loved it by all!!! kids n adults!!!cheese just melts in d mouth

Foodie #668370
March 13, 2025, midnight
Hi I hv tried this recipe.. taste is good..bt the cheeese from poppers while frying flows out....after 2-3mi. of frying....pls suggest what to do

Tarla Dalal
March 13, 2025, midnight
Hi add 2 to 3 tbsp of cornflour in the breadcrumbs and coat the cheese slice well,and make sure the to deep fry on medium flame. Happy Cooking!!!

Sharada390
March 13, 2025, midnight
This recipe is a must try. Absolutely delicious and easy to make. However I found the batter to liquidy. Added more flour to make it thicker so that cheese does not come out during frying. Also making the starters and putting them in the fridge for more than a day helps - the cheese does not flow out then.

sudarshan gupta
March 13, 2025, midnight
I tried this recipe. I couldn''t make it. when I roll my cheese , it is getting break. I have tried with fresh one also and old one also, all are getting break

Foodie #684562
March 13, 2025, midnight
good

Paridhi Agarwal
March 13, 2025, midnight
Hi The recipe was easy nd delicious.. however while rolling the cheese slice the slices broke. Can u suggest what myt b the probable reasons and how to overcome it? Thankyou

Tarla Dalal
March 13, 2025, midnight
Hi Paridhi, Thank you for your kind words. Do try more and more recipes and let us know how you enjoyed them. Make sure your cheese slices are not very frozen to avoid them from breaking. Happy Cooking !!

Nimmi
March 13, 2025, midnight
It''s unique n simple receipe Love it


-627.webp)
